
How to Remove Hair Extensions Without Damage: A Gentle Guide
Hair extensions can dramatically change your look, adding length, volume, and style. But the removal process is crucial. Improper removal can lead to breakage, hair thinning, and scalp irritation. This guide provides a step-by-step approach to safely remove your hair extensions, minimizing damage to your natural hair.
Before You Begin:
-
Identify Your Extension Type: The removal method varies significantly depending on the type of extension (clip-ins, tape-ins, sew-ins, fusion/keratin bonds, micro-rings). This article focuses on the most common types; however, always consult the instructions provided with your specific extensions.
-
Gather Your Supplies: You’ll need the appropriate removal tools depending on the type of extension. This might include:
- Clip-ins: Simply unclip them.
- Tape-ins: Tape remover (available at beauty supply stores), oil (coconut or olive), fine-tooth comb.
- Sew-ins: Sharp scissors (preferably those specifically designed for hair extensions), removal tool (if applicable), seam ripper (for smaller braids).
- Fusion/Keratin Bonds: Bond remover solution (professional-grade is recommended), fine-tooth comb, flat iron (low heat setting).
- Micro-rings: Pliers specifically designed for micro-ring removal.
-
Cleanse Your Hair: Wash your hair thoroughly to remove any product buildup or tangles that can make the removal process more difficult. Avoid using heavy conditioners before removal.
Removal Techniques:
-
Clip-ins: The easiest to remove. Simply unclip each weft and carefully store them for later reuse.
-
Tape-ins:
- Apply Remover: Gently apply the tape remover to the adhesive bond.
- Loosen the Adhesive: After the recommended time (check the remover instructions), use your fingers or a fine-tooth comb to gently separate the tape. Adding a small amount of oil can help further loosen the bond.
- Remove Gently: Slowly peel the tape off, being cautious not to pull or tug on your natural hair.
-
Sew-ins:
- Cut the Thread: Carefully use sharp scissors to cut the thread securing the wefts. Start from the ends to avoid accidentally cutting your own hair.
- Remove the Weft: Gently unbraid the cornrows or braids, working your way from the bottom to the top. If the wefts are very firmly attached, a seam ripper can be helpful to gently separate them.
- Detangle Carefully: Once removed, carefully comb through your natural hair to remove any loose threads.
-
Fusion/Keratin Bonds:
- Apply Remover: Apply the bond remover according to the manufacturer’s instructions. This usually involves carefully applying the solution to each bond.
- Soften the Bonds: Allow the solution to soften the bonds for the recommended time.
- Remove Gently: Using a fine-toothed comb, gently separate and slide the bond off your natural hair strand. A low-heat flat iron can be used to slightly soften the bond, making it easier to remove. Avoid excessive heat.
- Cleanse Thoroughly: After removal, thoroughly wash and condition your hair to remove any residue.
-
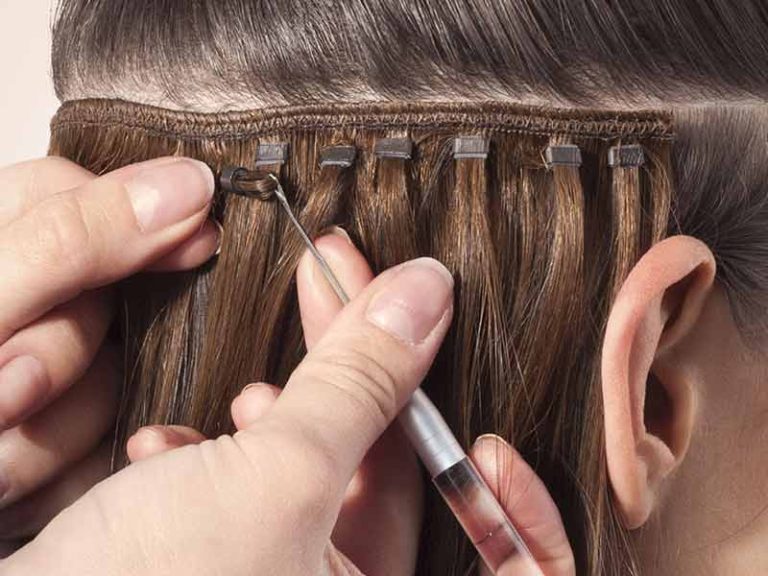
Micro-rings: Use the specialized pliers designed for your specific micro-ring type to gently open the ring and slide the extension off. Be very careful not to damage your hair.
After Removal:
- Conditioning Treatment: After removing your extensions, treat your hair to a deep conditioning treatment to replenish moisture and repair any potential damage.
- Professional Consultation: If you experience any difficulties or are unsure about the removal process, it is always best to consult a professional hairstylist. They have the expertise and tools to safely remove extensions without causing damage.
Prevention is Key:
Regular maintenance is crucial to minimize damage. Always follow the manufacturer’s instructions for care and maintenance. Avoid overly tight braids or extensions that pull on your scalp. Schedule regular appointments with your stylist for professional maintenance and removal.
By following these tips, you can remove your hair extensions safely and effectively, preserving the health and beauty of your natural hair. Remember, patience and gentleness are key to preventing damage.
